How to use Azure Business 2 Business (B2B) with SharePoint Online
From the beginning of SharePoint Online we have the option to share a site or document with an external user. When you use this feature the recipient need to have a Microsoft Account to login your SharePoint environment. Because this can be very confusion for the user, Microsoft is working on a Business 2 Business connection within Azure AD. With this connection you can share that same site or document with a user from another Azure AD tenant.
This feature is currently in preview but works pretty good already despite the manual steps you need to do. I will explain the steps below, but first let’s start with the basics.
How does this feature work?
The Azure B2B options makes it possible to create a federation based on a user’s login name from another tenant. This will show up in your own Azure AD as a normal user except that the source is not ‘Microsoft Azure Active Directory’ but ‘Microsoft Azure AD (other directory)’. 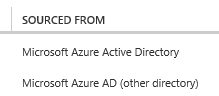
You do not have to create this federation; this is something Microsoft has built into the platform. You only need to add the user to your directory and when the user accepts the invitation this federation is setup. The user is not maintained in your Azure AD, it is only a placeholder for that user so it can be found in SharePoint Online. The other beauty of this is that you do not have to maintain passwords or requests for passwords, this is handled by the users own Azure AD.
How can we add this federated user?
Since this is a preview feature the UI is not the best experience, you need Azure AD and an CSV file to add the users. This means that your own end users cannot share the site or document from SharePoint like the current feature with a Microsoft Account. As an administrator you need to add the users to Azure AD with a CSV file as described here: https://azure.microsoft.com/en-us/documentation/articles/active-directory-b2b-references-csv-file-format/#sample-csv-file
In the CSV file you have the property ‘InvitedToApplications’, this is the AppId for SharePoint Online ‘00000003-0000-0ff1-ce00-000000000000’ The property ‘InviteRedirectURL’ can be used to give the user direct access to the correct site, this allows the receiving user to save the invitation and use that link to access the site or document.
When you have the CSV file created you have to do the following steps.
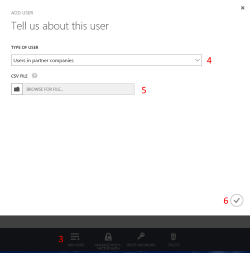
- Go to the old management portal (https://manage.windowsazure.com)
- Go to Azure AD and select your Active Directory
- Go to users and at the bottom click on ‘Add user’
- In this popup box select ‘Users in partner companies’
- This allows you to select the CSV file you just created
- When you uploaded the CSV file click on the OK button at the bottom.
Azure AD now adds the users in the CSV to you Active Directory and sends an invitation to the email addresses you entered.
How to share you site or document with these users?
Now that the user is available in our Azure AD we can add this user to the SharePoint site or share a document with them. The only problem here is that SharePoint will not find the user on his/her email address or display name. When you use the email address the user gets another invitation that he/she can use with a Microsoft account.
To get the user added in SharePoint with the federated account, you need to use this format emailaddress#EXT#@.onmicrosoft.com. In the emailaddress you need to change the @ for an _.
So as an example the email address is arjan@contoso.com the federated account is arjan_contoso.com#EXT#@acornelissen.onmicrosoft.com.
I hope when this feature is out of preview that there is a nice UI to add the user as a federated user and an integration with SharePoint like the current Microsoft account.