Updating my Azure resources to ARM
Last week the news came that the migration of IaaS from the classic deployment to Azure Resource Manager went General Available (GA). (https://azure.microsoft.com/en-us/blog/iaas-migration-ga/). Not everything can be migrated yet, see this list for the unsupported features for now (https://azure.microsoft.com/en-us/documentation/articles/virtual-machines-windows-migration-classic-resource-manager/#unsupported-features-and-configurations)
I have a few resources still in the classic deployment model that are supported to move to the new Resource model.
The manual from Microsoft is very good to get you started with updating your PowerShell CmdLets and executing the necessary scripts.
Should I migrate?
The first question of course is there a need to migrate? The answer for that is as most of the tech questions it depends. If everything that you are using now is working as a charm and have no need for the new possibilities than the answer is no. Your resources will keep working. If you want to have all the options that the platform provides then you should update your resources to the new model, but make sure that you can update and don’t have dependencies in the unsupported part.
Updating my resources
I started fairly simple by updating my storage accounts I use for backups.
I followed the manual (https://azure.microsoft.com/en-us/documentation/articles/virtual-machines-windows-ps-migration-classic-resource-manager/) and the storage accounts where migrated in just a few steps. I noticed that you have to follow the steps one at the time and don’t just skip to the few rows of PowerShell to migrate your storage account.
One of the thing you need to do is register a AzureRmResourceProvider and wait a couple of minutes before actually migrating the resources. When connected and registered the migration of a storage account is just 2 lines of PowerShell
After the migration I noticed that the ‘All Resources’ blade in Azure was not updated, switching to a different subscription and back fixed that. I started a new backup to the migrated storage account and everything worked as before.
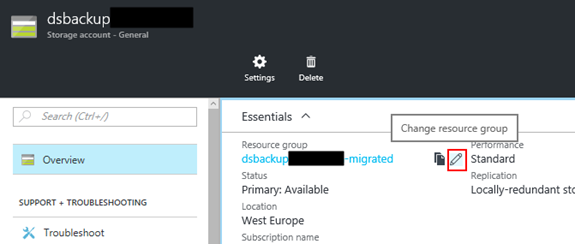
In the above image you see that the Type is changed from ‘Storage account (classic)’ to ‘Storage account’ and that the icon is changed from blue to green indicating that it is the new deployment model. Also there is a new resource group created for each storage account, but you can move it back in the portal very easily by clicking the pen icon next to the ‘Resource group’.
After this update the blades did not work, so switching between subscriptions did the trick.
Upgrading my VM
Updating my storage accounts went well, now it was time to upgrade my VM. The VM is just a single machine in a cloud service outside a virtual network. For this I needed a few more lines of PowerShell.
This will create a Virtual network and will set the VM’s in the cloud service in a migration status, now you need to check if all the VM’s have the status ‘Prepared’.
When that status is ‘Prepared’ you can Commit the migration. The storage account where the vhd file is on will not be migrated in this script, that is one you need to do manual with the above steps. With this VM migration we get a few more resources as you can see in the image below.

When there is a firewall port open to your VM, there is also a public load balancer created with the same port as before and the DNS name to connect to the VM is the same.
Conclusion
The migration of resources went very smooth and by just following the manual that is available the migration was a piece of cake. I moved all the resources into a new resource group with a better name to make it easier to find everything back.