Getting started with FIDO2 authentication in Office 365
With this post, I will take you on the journey to enable FIDO authentication for Office 365 as an alternative to the Authenticator app or as an addition to the Authenticator app.
What is FIDO
FIDO stands for “Fast IDentity Online” and provides a passwordless authentication method with a passkey like the Yubikey 5. FIDO allows you to log into many websites and devices without entering a password. In-depth information about FIDO can be found on the FIDO Alliance website.
Passkey
Before starting, you must buy one or more passkeys; the best known is from Yubico called the Yubikey. These can be purchased directly at Yubico but also at Amazon. For the best practice, it is best to have two keys. In case the primary is lost or broken, you have a backup.
Configure the Yubikey
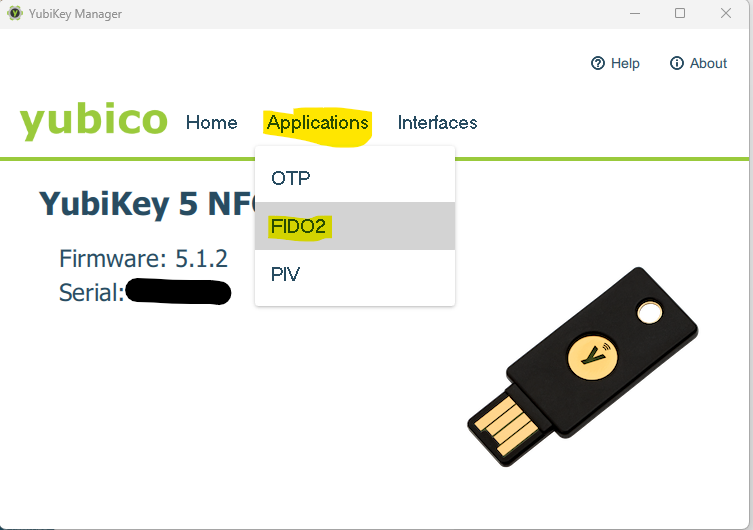
The first thing to do is; download and install the Yubikey manager. After inserting your key into your PC, the app will recognize your key, and here, you can enable and configure FIDO2, OTP, and PIV.
To configure FIDO2 for your Yubikey, go to “Applications” -> “FIDO2”
 Configure here the pin code for FIDO2
Configure Azure Active Directory
Now that we have the key configured, we must tell Azure Active Directory to accept these keys as an authentication method.
For this, go to the “Azure Portal -> Azure Active Directory -> Security -> Authentication Methods” or use this direct link: https://portal.azure.com/#view/Microsoft_AAD_IAM/AuthenticationMethodsMenuBlade/~/AdminAuthMethods
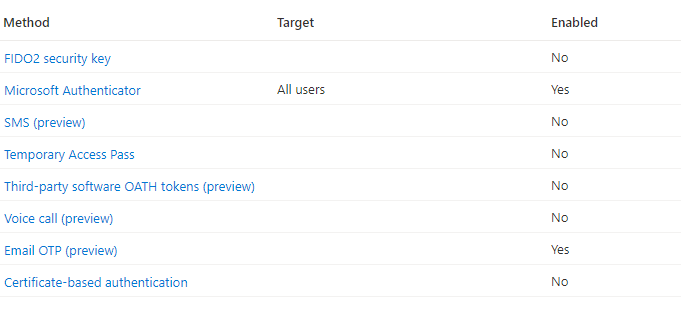
On this page, select “FIDO2 Security key” and enable it. If you want to pilot it first with a group of users, configure that group here; otherwise, it will is turned on for everyone in your tenant. Another option is to include everyone in your tenant and exclude certain groups. So configure it to your use case and liking.
Register the key
The easiest way to register the key is to use https://aka.ms/proofup. Log in and select “Add sign-in method”; in the prompt, select “Security key” and follow the directions on your screen. As mentioned before, do this for both keys.