As a follow up on my post from last week I wanted to add some extra data in the terms. This is not possible with the default CSV import that SharePoint has. I mentioned in my previous post that Office Dev PnP has also an option to import terms. And with that option we can add a lot more than only the term itself.
What commands do we have? We have a 2 options here to add term to Office 365.
This week I was working with the term store and had to create and import a big chuck of data in the term store. We all know that we have multiple options here
Just enter them one by one in the browser (great for a few entries) Use the csv import Use CSOM Use Office Dev PnP PowerShell This post will address the csv import.
Getting started with the csv For the csv import we have a sample that can be downloaded from the term store (http://-admin.
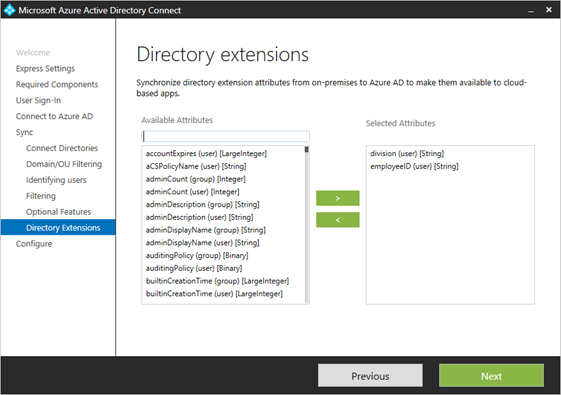
This week I had a customer that has some data in their on-premises Active directory that we needed to use for a custom application in SharePoint Online. This data was placed in the ExtensionAttribute field of the user. With the latest version of Azure AD Connect we have the option to select attributes to sync to Azure Active Directory and that is what the customer did. https://azure.microsoft.com/en-us/documentation/articles/active-directory-aadconnectsync-feature-directory-extensions/
This screenshot has selected division and employeeID, but in the complete list of available attributes there are also the ExtensionAttributes.
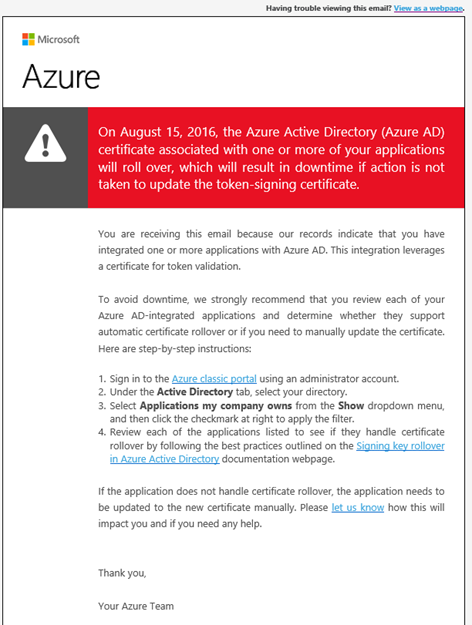
Last week Microsoft has send an email that on august 15th 2016 the Azure AD token-signing certificate would roll over and that I had some applications that is using this token-signing certificates. The list of applications contains all of them, this was not very useful.
Luckily there is a short step-by-step instruction with a link to a complete manual (https://azure.microsoft.com/en-us/documentation/articles/active-directory-signing-key-rollover)
Because I manage a few Azure Active directories like many developers, this was going to give me some work.
In my previous post I wrote about using Azure automation to start and stop an Azure VM that is deployed using Resource manager. If you did not read that one I suggest you read it first since I will use that setup and the scripts in this post.
The azure automation has a great editor, but there is no version control in it. To solve this Microsoft added an option to integrate with GitHub and Visual Studio Online.
Last week I updated my Azure storage and Virtual machines to Azure Resource Manager. Before that I had the OneShare for MSDN app from Sogeti to start and stop my VM every day so I could start using it without having it to boot manually. Unfortunately the app cannot authenticate with Azure Resource Manager so I have to find another way to make it automatically start and stop.
Azure Automation The first thing I thought of was Azure Automation, I use that a lot and I have the knowledge of PowerShell to make this happen.
Last week the news came that the migration of IaaS from the classic deployment to Azure Resource Manager went General Available (GA). (https://azure.microsoft.com/en-us/blog/iaas-migration-ga/). Not everything can be migrated yet, see this list for the unsupported features for now (https://azure.microsoft.com/en-us/documentation/articles/virtual-machines-windows-migration-classic-resource-manager/#unsupported-features-and-configurations)
I have a few resources still in the classic deployment model that are supported to move to the new Resource model.
The manual from Microsoft is very good to get you started with updating your PowerShell CmdLets and executing the necessary scripts.
In the trend of my recent blog post I create a new addition to my automation of Office 365 tasks. This time creating a report with the license consumption per month with PowerShell automation, Azure table storage and Power BI. In this post I will take you with me thru the steps to set this up.
What do we need? Before we can get started coding we need to do some plumbing first.
Last week I was getting complaints by users in our Office 365 environment that the address book in Exchange was not up to date. The issues was that users where getting email addresses with the .onmicrosoft.com as the default email address. The users with these onmicrosoft.com mail addresses where users that are in our on-premises Exchange environment.
The situation At this customer we have a select group of users in Office 365 and all other users are in an on-premises Exchange environment.
Two weeks after my visit to SharePoint Saturday Paris I visited SharePoint Saturday Netherlands. The schedule for today was a bit more relaxed than in Paris. We had 4 session slots of 75 minutes with great sessions and more time in between the sessions to have a chat with sponsors, trying out the HoloLens and playing some games. The HoloLens is a very cool device and I tried it here for the first time.